
The 1 Thing You Need to Keep Inspiration Flowing During Any Project

Have you ever had that burning desire to start something new - whether it's a passion project or a life-changing goal - but no matter how hard you try, you just can't seem to take the first step? Or you do take that leap, only to find yourself struggling to stay consistent, constantly fighting the urge to give up?
You're not alone.
Many of us struggle with this, but what if the key to overcoming it is simpler than you think?
Stay with me here, I have an easy solution for how to stay motivated throughout ANY project.
Prologue:
I walked into a room I’d never experienced before - it was bathed in natural light, and appeared almost industrial. The open stone made me feel as though I was in a building hundreds of years older than me, while rows of sewing machines sat along long tables that lined three of the four walls.
In the center of the room stood two long rows of counter-height tables, their tops cluttered with sketchbooks, pencils, and half-finished designs. I couldn't help but feel the weight of expectation in the air.
I had just begun my Apparel Design degree at the University of Minnesota, and though I was eager, my experience with sewing was limited to the short-lived lessons from my middle school home economics class. I was a fish out of water.
The professor’s voice cut through the faint sound of students cutting cloth with their shears. "Today, we begin the process of creating your first design," she said, handing us a brief. "Your task is to conceptualize one styled outfit. We’ll start by developing a mood board."
The words mood board brought with it some excitement. I’d never made one, let alone known what it was. But it sounded like a fun way to start a new project…
What Is A Mood Board?
To put it simply, a mood board holds your inspirations for a particular goal in one spot. It helps your brain unravel what it gravitates to and put it all in a visual format. It’s an arrangement of images, materials like fabrics or buttons, or plants, copy, and so on.
Pulling these materials into one cohesive board allows you to hone in on your inspirations and set yourself up for success when starting any project.
If you have a project - whether it be planning a trip to a certain destination, redecorating a room in your home, or designing a collection of art prints - mood boards help you to step in the right direction. Bonus: They can also help keep you on track for life goals and changes, too! This tool can truly be applied to anything you want to set your mind to.
Have you heard about the recently viral vision boards? Particularly popular around New Year, it’s a board where you put all of your hopeful visions in one spot, to sort of create a vision board manifestation for the coming year. Well, mood boards aren’t far off from that.
Vision Board Vs. Mood Board
Vision boards focus on the big picture of your life. What do you want to manifest for the year to come, or for the next five years? And ultimately, this is a reflection of your personal values.
Do you know your values?
Examples of personal values can be:
Honesty
Creativity
Self-reliance
Productivity
And more…
I’d encourage you to do some research if you aren’t completely sure what your personal values are, but just starting with your vision board can help you determine these values, too.
Vision boards will hold images and materials that bring a sparkle to your eyes and make you say to yourself, “This is who I want to be.”
Well, mood boards are similar bodies of images or materials, but they help you narrow down specific goals or projects that support the bigger vision captured in your vision board.
Maybe you’re not doing a project for yourself, but instead for a client. Say a client is asking you to develop their branding. If that’s the case, I hope you’re at a point in your life where you can choose clients that reflect your values and what you want to work on. But maybe you’re not, and that’s okay too. Either way, you’re able to take that client's values or goals and visually put them into a board for the overall aesthetic of their branding.
Honestly, a mood board doesn’t have to be that deep. Regardless of your situation, a mood board will help keep your (or your clients) inspiration in one place for easy reference throughout the project. It’s really simple, actually.
And to be able to reference all of the inspiration in one place is the key. That’s really the whole purpose of this - you have a visual of what makes your brain tick, and you can reference it whenever you need some lifting up throughout the creative process.
The Creative Process
The part where your mood board will come in handy most
The title of this blog post is “The 1 Thing You Need to Keep Inspiration Flowing During Any Project” for a reason. Because you can start something - whatever your heart desires - and you may get stuck, or even end up feeling like you hate it before finishing. You start feeling like a failure. But you’re not. This happens during the part of the creative process that’s hardest to get through. The “crap, I can’t do this” phase.
This concept is not new. Everyone who has started a project knows it’s not a smooth flow. If it is, you’re either extremely lucky, or the project wasn’t very substantial.
Here’s what the process typically looks like:

You begin with that dopamine hit of excitement. It’s the stage where you feel like you can do anything you set your mind to - and in this case - whatever your project is. But the hard part is doing the thing, and it’s not uncommon for the dopamine to start diminishing over time until you reach the goal.
Maybe the process takes longer than you expected, or it requires a lot of bits and pieces you didn’t originally think about. And it makes you want to give up.
The point is: DON’T GIVE UP
When you’re feeling lost, you need to remind yourself of two things: the beginning feelings when you were SO excited about this project, and how you will feel once you reach the end goal. This is where the mood board comes in.
The next point is: GO BACK TO YOUR MOOD BOARD
Spend as much time as you need to look at it, and experience the materials and images that gave you that spark in the first place. Or maybe you’re feeling stuck and unsure where to go next - and referencing your mood board may bring forward the inspiration for your next steps to get unstuck.
OK, so you’re convinced you need a mood board for your project…
Designing Your Mood Board
Key Elements
The Project: Creative Concept or Theme - You should know what you want to achieve at this point already - whatever the project is that brings you that twinkle in your eye. Now, you need to dig deeper: What’s been grabbing your attention lately? Is it your neighborhood park or garden? Maybe the city vibe, cool buildings, or some local history? Or are you more into animals and getting out in nature?
Knowing what you’re inspired by with your project is the KEY here.
An example:
You want to build a garden in your backyard. Inspiration is thriving within you as you picture a garden oasis - full of fresh veggies and buzzing life. Your vision includes a lush mix of greens, with tomatoes and cucumbers climbing up a beautiful trellis that’s as functional as it is eye-catching. And it’s not just about the harvest - you’re also thinking about the bees and butterflies, so you’ll be mixing in plenty of flowers to make it a space that thrives for everyone.
Your theme for the mood board would be centered around building a beautiful garden, with lots of greens and a fresh… Maybe along with your vision, you’re inspired by a Tuscany-esque feel that brings with it lots of sun and feelings of a slower lifestyle. Or you’re inspired by the types of insects and buzzing creatures your garden may attract to it. Whatever it may be, follow your theme, then your inspiration for the theme to get started.
Materials - You have your theme and inspiration, so now it’s time to gather the materials for your mood board. Images, fabric, objects like plants, buttons, trims, and anything that relates to your concept. Take your theme and search high and low for whatever you feel should be included in your mood board.
Let’s go back to our example above. If your theme is building an abundant garden in your yard, inspired by Tuscany, your materials could be images of the Tuscan countryside and pieces like cobblestone and vining plants.
Color Palette - Color palettes are always such a fun part of the process. Sometimes, the colors you’re drawn to become part of your inspiration, depending on what your project is. But most of the time, the colors develop through the inspirational images or materials you gravitate towards.
A great rule of thumb for your color palette is:
If you have colors picked out as part of your inspiration, choose materials that use those colors. This allows the board to be cohesive and as representative of your concept as possible.
If you chose your inspiration and materials before deciding on a color palette, simply look at the items you’ve gathered and pull colors from there. The materials you chose likely have a theme of colors within them.
Cohesive Placement - you may have a ton of materials, and in fact, the more the better. But you may not use everything on your board, and that’s okay.
—> Start by gathering your materials in one place. Spread them out so you can see them all. Then, grab whichever ones bring you the most joy and begin placing them somewhere on your board. At this point, it doesn’t matter where, just place them there.
—> Once you have the ones that you like the most set onto the board, start arranging them however it makes sense to you. You don’t want the board to look cluttered, so make sure to arrange them in a pleasing way that you’ll be able to understand.
—> At this point, you may need to add and subtract materials from the board. If you need to add - grab more materials that you enjoy that will look great with the items you already have on your board. If you need to subtract - take away whatever doesn’t make as much sense as the other items you have on your board.
Ultimately, the placement is important so that you understand what you’re looking at and so it looks JUST like how you envision your inspiration inside your head, in physical being!
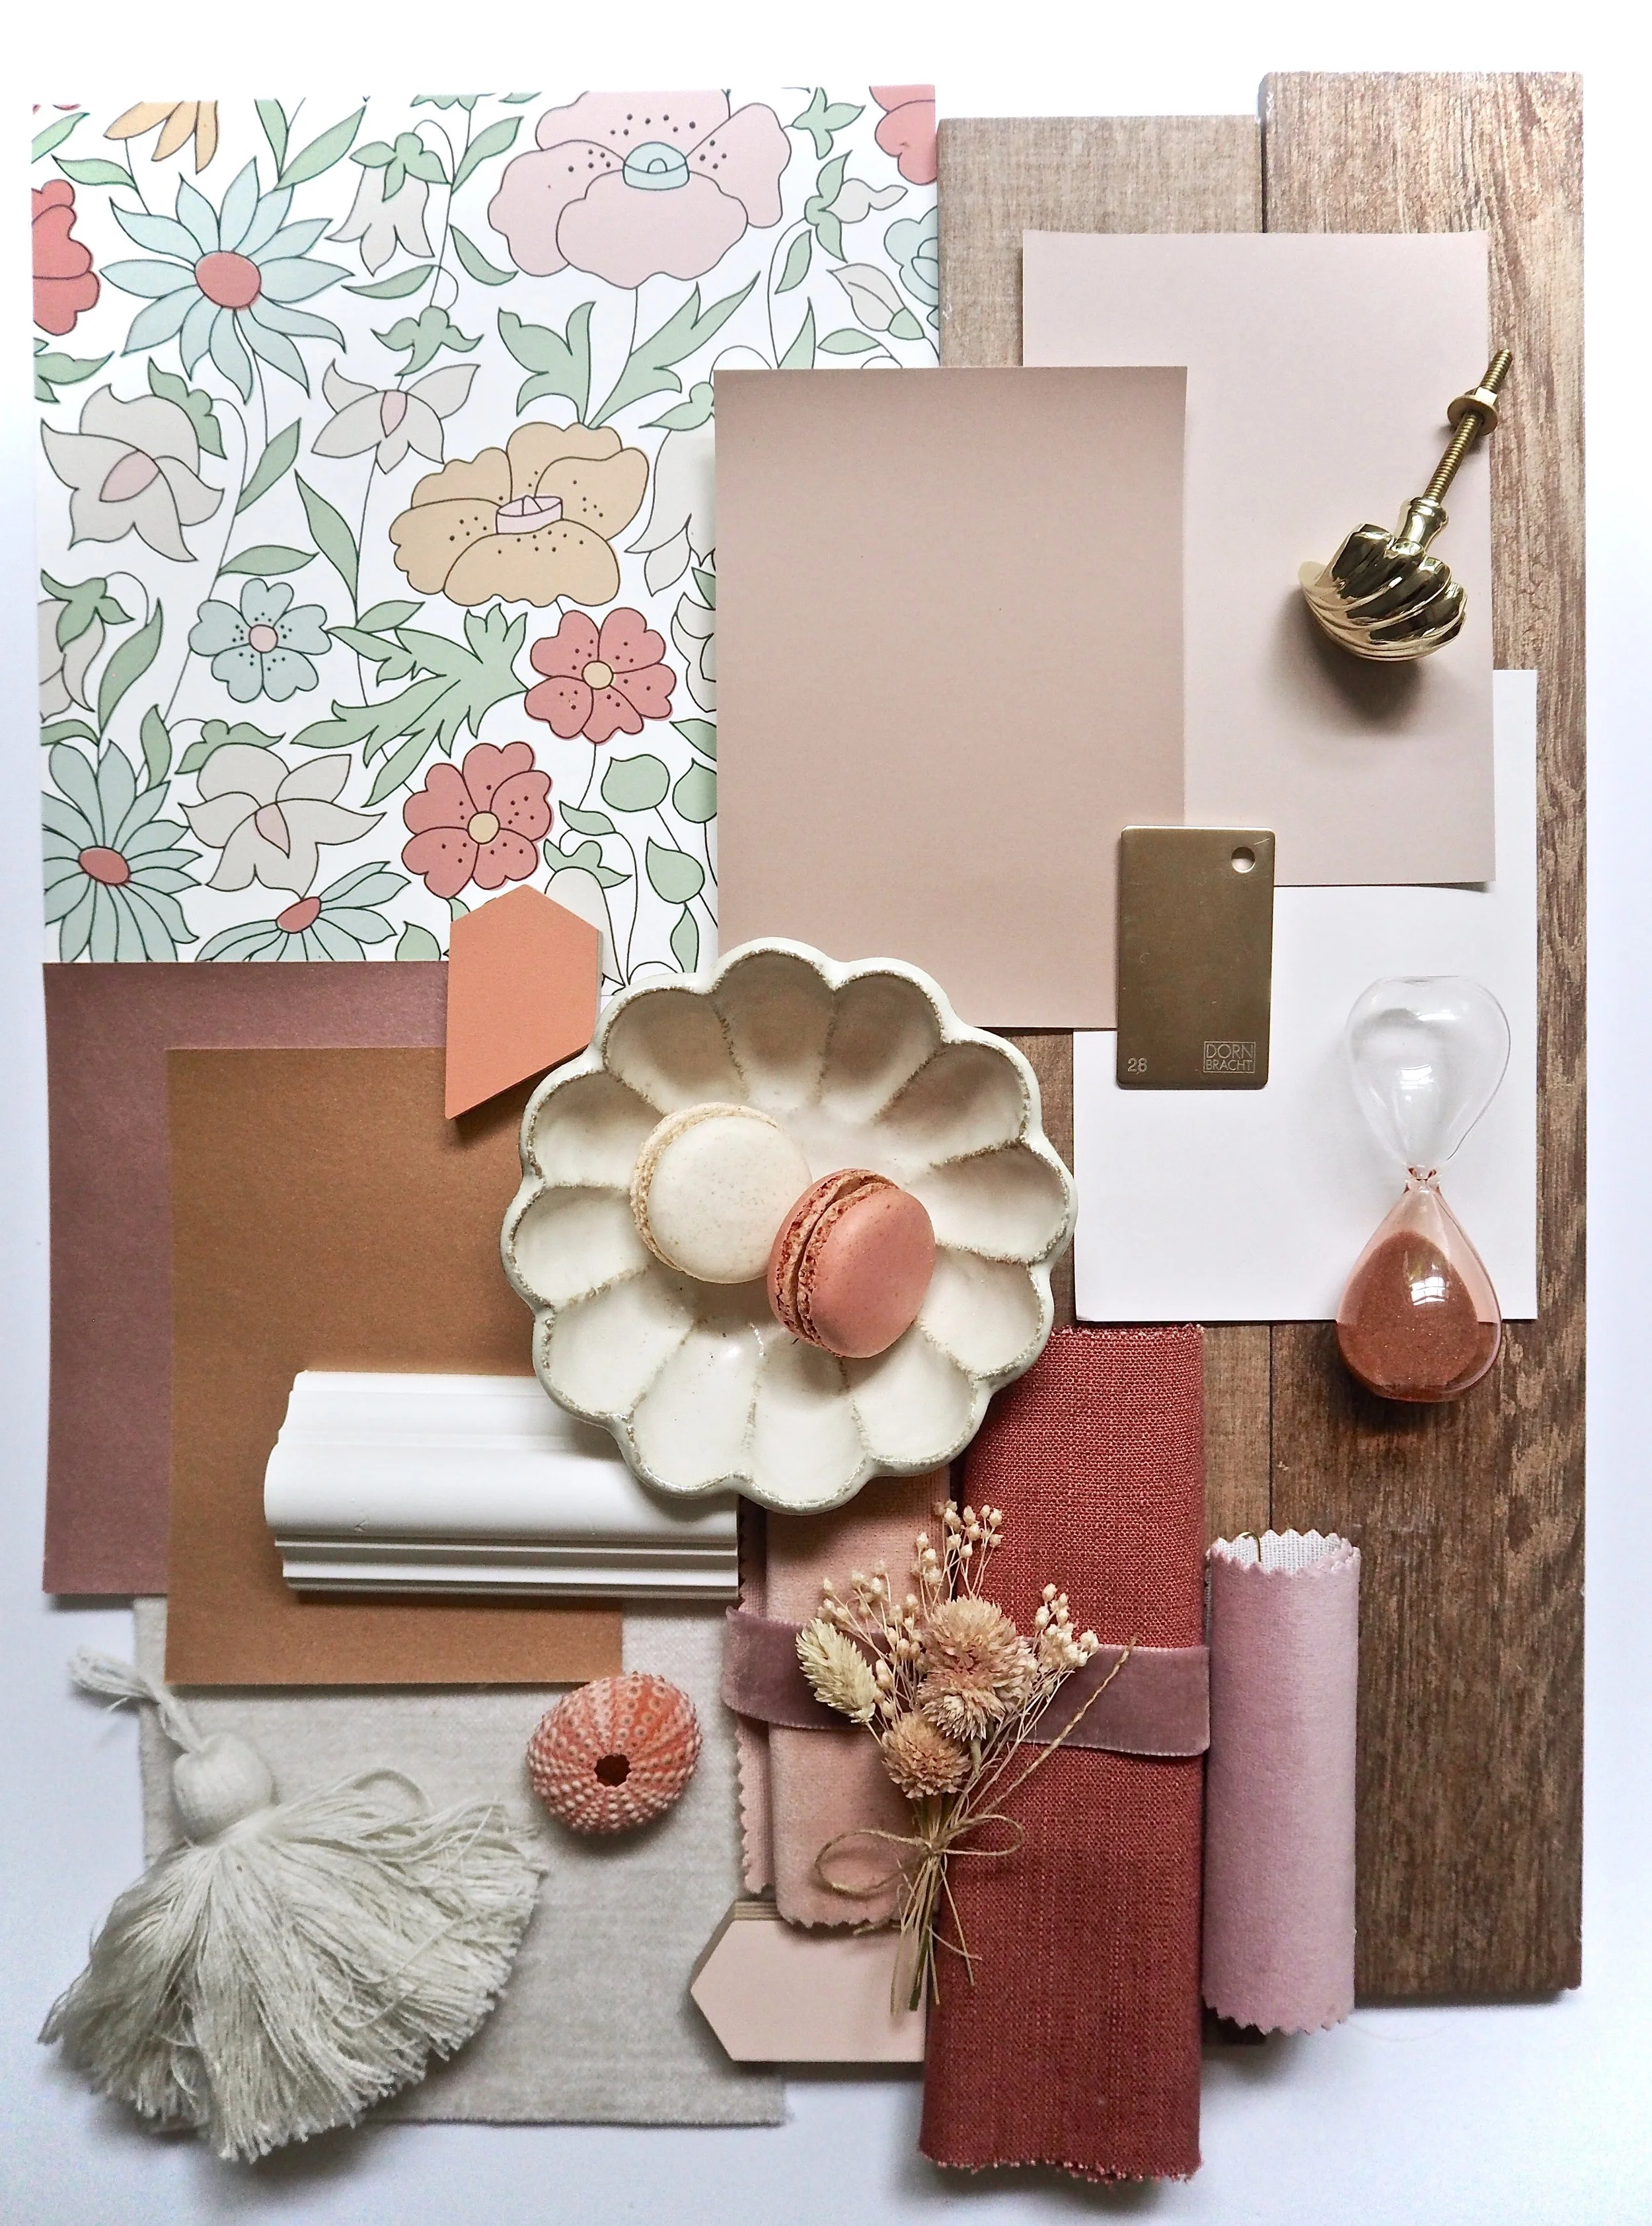
Types of Mood Boards
There are a few different ways you can create mood boards. They can be physical - images from magazines, plants from your backyard, buttons from an old sweater… All are placed onto foam board or another surface area you want to use. Or, they can be digital.
I’d encourage you to experiment with both and see what you like or what works for you. It also can depend on your specific project. If your mood board is about traveling to a certain destination, digital may be the best option. If your mood board is about redecorating your kitchen, a physical mood board may provide more clarity by using physical fabric, color, and materials swatches.
Physical Mood Board Examples:


Digital Mood Board Examples:


Mood Board Layouts
There are a few different layouts that you can follow for your mood board - and the best part is: it’s totally up to you! Below, I’m describing a few common layouts that you can use to approach your mood board.
Grid
A common layout uses square or rectangle images and evenly space them showing borders around each image from the backdrop. This is a very organized approach that is easy to follow for any viewer. This type is great for presentations when you need others to easily visualize exactly what you want them to.
Example:

Layered
Another approach, that’s similar to the one above, is to take square or rectangle images and overlay them over each other, while keeping an organized look.
Example:

Abstract
Another layout option is to be abstract. An abstract layout doesn’t care for defined edges or clean lines. It can be a plethora of materials layered over one another, or having a defined center image along with supporting materials surrounding it.
Example:

As long as your mood board looks balanced and cohesive, and is a visual representation of what you want, that’s all that matters. So go have fun exploring how you want your inspirations represented!
Prologue (continued):
I found a spot near the back corner of the studio and set down my supplies. The professor had just finished giving instructions to creating a mood board, and I already knew what direction I wanted to take. My personal style had always leaned abstract, and I could see my mood board forming in my mind before I even opened my laptop.
It was 2013, and digital art still felt like new territory. But something about it called to me. I decided to lean in and make a digital mood board - bold, unconventional, and entirely mine.
Fast forward four years: I was at the end of my Apparel Design degree, preparing to take that leap into the real world. But first, I had to finish the final collection that would define me as a designer. By then, digital design felt like a second language, and abstract mood boards were my go-to.
The theme of my collection was avant-garde and runway-only. My inspiration consisted of crawly creatures - beetles and moths - enveloped in stunning colors, textures, and intricate structures. Their legs, wings, and antennae became my muses. The color palette showed primarily through pastel lavender and yellow, grounded by blacks and whites.
My mood board brought it all together. I included a structured silhouette to anchor my designs. A close-up of a beetle - both in color and black-and-white - highlighted the textures and transparent wings I wanted to echo in fabric. I added scattered lines and dots to reflect movement and rhythm, and a swatch of abstract embroidered fabric to represent texture and depth.
That board became my compass. Every time I veered off course or second-guessed a design choice, I came back to it. It reminded me what details mattered most, what story I was telling, and how I wanted people to feel when they saw the final collection.
Because of that mood board, I stayed focused. I created a collection that felt cohesive, honest, and true to the vision I’d carried with me since that very first day in the studio.
My Digital Abstract Mood Board:

A Glimpse At My Collection:

Now, mood boards are part of almost everything I do. I use them to shape the art I create - whether it’s for myself, a product line, or a new collection. I build them when planning home renovations or dreaming up a future trip. They’ve become more than just a starting point - they're a grounding tool, a visual reminder of where I’m going and why I started.
The beauty of a mood board is that it can be whatever you need it to be: a creative spark, a roadmap, or simply a space to explore what inspires you. So gather what lights you up - colors, textures, images, words - and place them somewhere you can see. Whether it’s digital or handmade, let it guide you. Let it remind you of your vision when things feel scattered.
Start with what feels good, see where it takes you, and make sure to share it with the world!